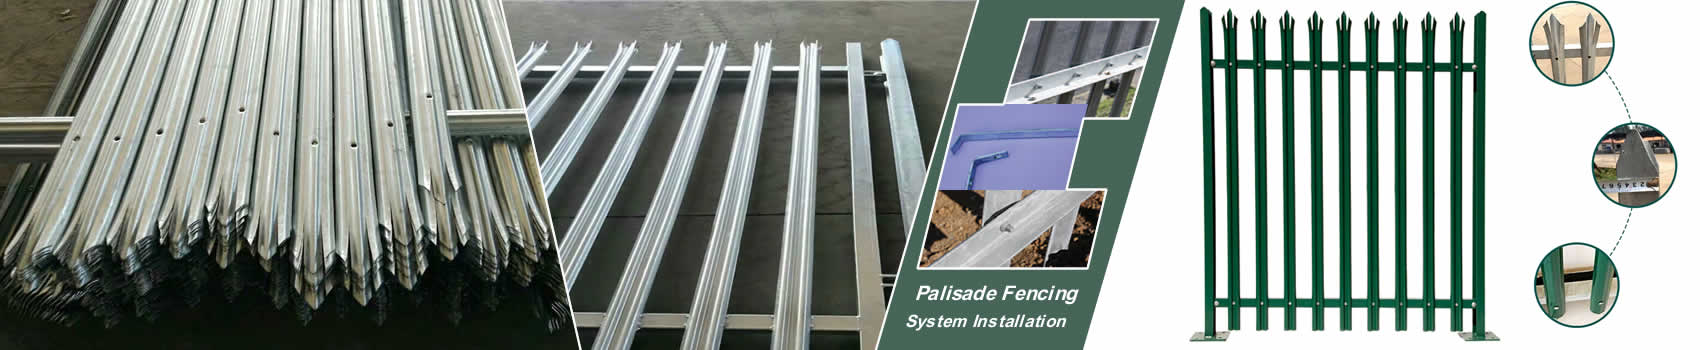
Palisade Fences, Galvanized, Powder Coated, Black Finishes
- Hot Dipped Galvanised Palisade Fencing
- Prefabricated Steel Palisade Fencing Painted
- Black Coated Steel Palisade Fencing
- Powder Coated Galv. Steel Palisade Fence
- Wrought Iron Palisade Fence
- GRP Palisade Fencing
Steel Palisade Pale Types
Fencing Heads Shapes
- Palisade Fencing Tops General Intro
- Palisade Fence with Round and Notched Top
- Triple Spike Pointed Palisade Fence
- Single Pointed Palisade Fence
High Security Fence Systems
- Perimeter Safety Palisade Fence System
- Palisade Fence Hot Rolled Galvanized
- Substation Security Paliasade Fence
- Razor Wire Topped Palisade Fencing
- High Security Palisade Fencing
- Palisade Curved Fence Panels
- Razor Barbed Wire
- Concertina Razor Barbed Wire
- Single Spiral Razor Wire
- Y Steel Palisade Fence with Concertina Razor Wire
- Chain Link Security Fencing
- Fencing Razor Spikes
- Weldmesh Panels
- Curved Welded Wire Mesh Fence
- Fencing Gates
TYPICAL WAY OF PALISADE FENCING INSTALLATION
Palisade fencing is installed for general and high security sites. All fixings are high security and anti-vandal.
High security anti tamper fixings are used throughout the installation of the whole system. All components are hot dipped galvanised to BS EN ISO 1461 and other international standard as per specified.
Palisade fencing properly installed provide long service life with replacements directly available from our factory stock.
General Information on Palisade Security Fencing System Installation
Erection
Line and level:
The fence shall be erected so that on completion it is on the line indicated. The top of the fence shall be clean line to the eye.
Posts: Shall be erected at no greater than 2.75m centers as specified.
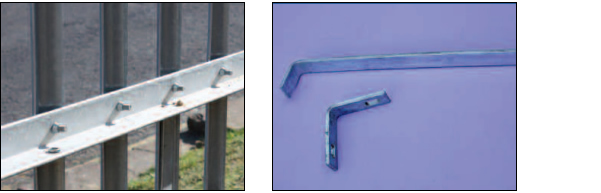
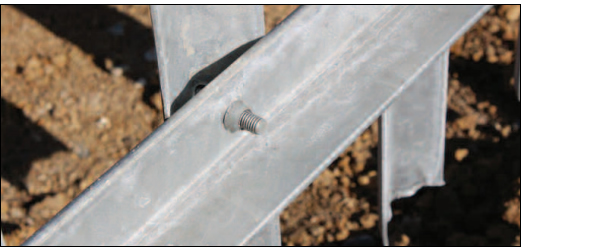
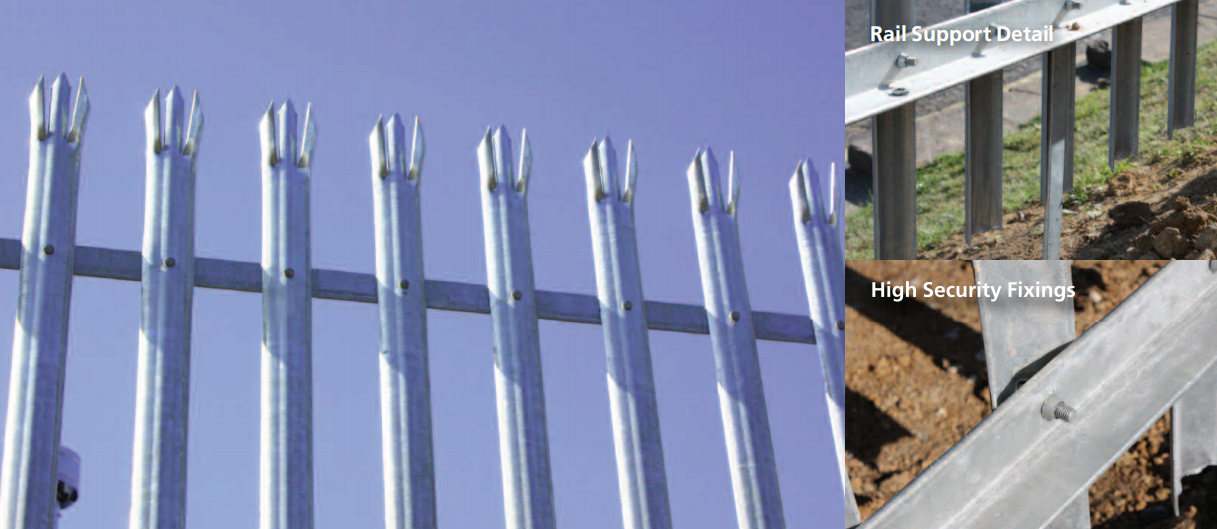
Horizontal rails: Shall be secured to fishplates that pass through the posts using M13 cup square bolts with permacone nuts.
Steps
Posts Setting
Posts are set into the ground and anchored in position by encasing a portion of the upright in concrete below ground level. Surface mounted posts can be
manufactured with a suitable base plate for bolting down.
Connection of Posts
Posts are connected through with horizontal rails with link plates and a corner plates at corners.
Once the posts are set upright the horizontal rails can be connected between them.
Pales are offered up into position and bolted in place with high security anti tamper fixings.
Depending on the height of the fence there will be one or two support feet connected to the lower horizontal rail.
The lower rails provide support to keep the fence panels in firm structure.
They are fixed between a pale and the rail and are either set into the ground with the posts,or bolted to a suitable substrate.
Undulating ground is accommodated simply by installing the posts between the two points of incline/decline.
The horizontal rails are attached between the two points. The pales are then installed in the vertical position.
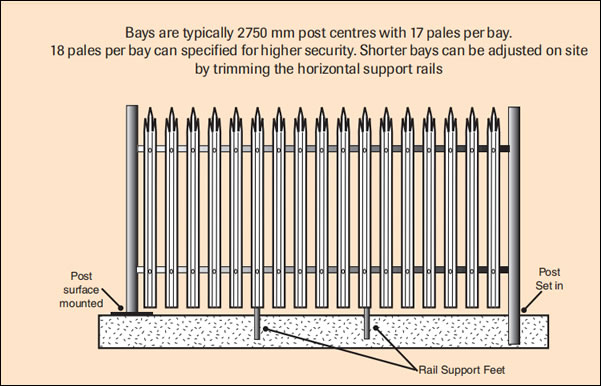
Bay Sizing Guide for Installation of Palisade Security Fencing System
Bays are typically 2750 mm post centres with 17 pales per bay.
18 pales per bay can specified for higher security. Shorter bays can be adjusted on site
by trimming the horizontal support rails.
Diagram:
Installation of Frame Posts and Steel Fence Panels on A Incline
Posts are set in at each end and rails are connected between the two points. The pales are offered up in the vertical plane and fixed to the rails.This procedure can follow any undulating terrain.
Pales are always 50 mm shorter than the specified fence finished height. This gives a 50 mm gap along the bottom of each bay.
High security areas may require longer pales typically cast in to a concrete up stand. Pales are normally increased from 17 per 2.75m bay, to 18, decreasing opening sizes between pales.
When using W section pales to form fencing panels, the thickness is also increased to 3mm (Heavy Duty) for high security applications.
M12 anti vandal connection bolts are used for the horizontal rail connections.
M8 anti vandal connection bolts are used for the pale fixings.
All items are galvanised to BS EN ISO 1461
Powder coating (If Required) is to BS1722 Part 16 and BS6497
Diagram:
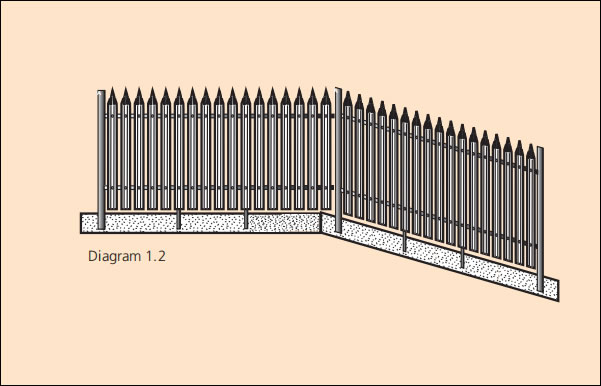
EXAMPLE INSTALLATION ON AN INCLINE
Posts are set in at each end and rails are connected
between the two points.The pales are offered up
in the vertical plane and fixed to the rails.
This procedure can follow any undulating terrain
Important note:Pales are always 50mm shorter than the specified fence finished height.This gives a 50 mm gap along the bottom of each bay
High security areas may require longer pales typically cast in to a concrete up stand. Pales are normall increased from 17 per 2.75m bay, to 18, decreasing opening sizes between pales.
When using W section pales, the thickness is also increased to 3mm (Heavy Duty) for high security applications.
M12 anti vandal connection bolts are used for the horizontal rail connections. M8 anti vandal connection bolts are used for the pale fixings.
All items are galvanised to BS EN ISO 1461
Powder coating(If Required) is to BS 1722 Part 16 and BS 6497
Fencing System Sizing Guide ( Finished Fence, Pale, Rail, Post) for Installation
| Overall Finished Fence Height | Pale Length Giving * 50mm gap along bottom | Rail Support Feet Required | Post Length when Setting in | Post Length when Surface mounted |
| 900mm | 850mm | 1 | 1125mm | 900mm |
| 1000mm | 950mm | 1 | 1250mm | 1000mm |
| 1200mm | 1150mm | 1 | 1525mm | 1200mm |
| 1400mm | 1350mm | 1 | 1750mm | 1400mm |
| 1500mm | 1450mm | 1 | 1925mm | 1500mm |
| 1800mm | 1750mm | 1 | 2325mm | 1800mm |
| 2000mm | 1950mm | 2 | 2625mm | 2000mm |
| 2100mm | 2050mm | 2 | 2725mm | 2100mm |
| 2400mm | 2350mm | 2 | 3125mm | 2400mm |
| 2750mm | 2700mm | 2 | 3590mm | 2750mm |
| 3000mm | 2950mm | 2 | 3925mm | 3000mm |
Export Packing:
The goods ready for installation shall arrive carefully packed and protected in appropriate manner to ensure adequate protection and prevent their damage during transit and rough handling.
Palisade Gates Installation
Gates come with their own supporting posts which are
designed to take various gate widths/height and overall
weight. Pales are affixed once the gates are installed.
All
gates have sliding lockable mechanisms. (Padlocks
supplied by the client).
Double leaf gates are generally hinged "in line" with the
supporting posts, offering the ability to open outward or
inward. Single gates are generally hinged on the left and
open inward only.
Should gates need to be hinged differently, this must be
advised at the time of ordering.
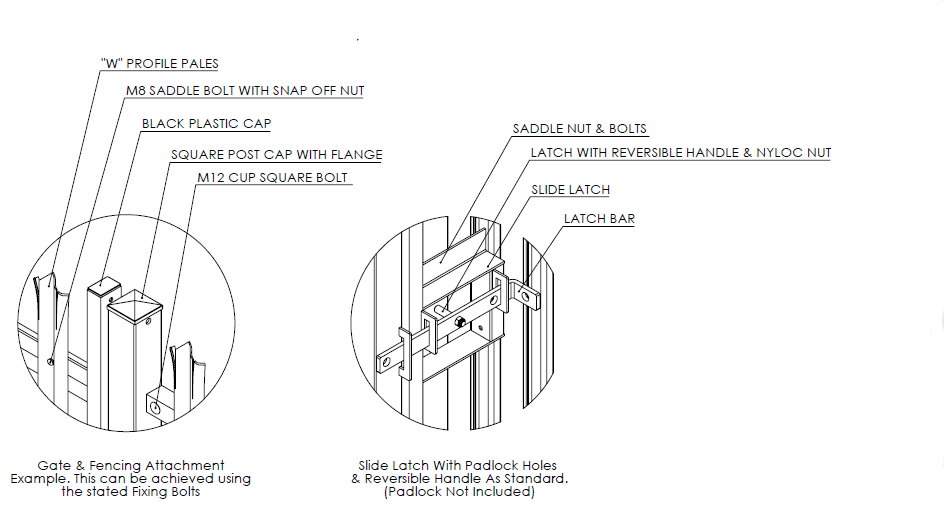
Diagram: Fixing of Palisade Fence with Gates